SparkFun JetBot AI kit – monteringsinstruktioner

Assembly Guide for SparkFun JetBot AI Kit

Introduction

SparkFun’s version of the JetBot merges the industry leading machine learning capabilities of the NVIDIA Jetson Nano with the vast SparkFun ecosystem of sensors and accessories. Packaged as a ready to assemble robotics platform, the SparkFun JetBot Kit requires no additional components or 3D printing to get started – just assemble the robot, boot up the Jetson Nano, connect to WiFi and start using the JetBot immediately. This combination of advanced technologies in a ready-to-assemble package makes the SparkFun JetBot Kit a standout, delivering one of the strongest robotics platforms on the market. This guide serves as hardware assembly instructions for the two kits that SparkFun sells; Jetbot including Jetson Nano & the Jetbot add-on kit without the NVIDIA Jetson Nano. The SparkFun JetBot comes with a pre-flashed micro SD card image that includes the Nvidia JetBot base image with additional installations of the SparkFun Qwiic Python library, Edimax WiFi driver, Amazon Greengrass, and the JetBot ROS. Users only need to plug in the SD card and set up the WiFi connection to get started.
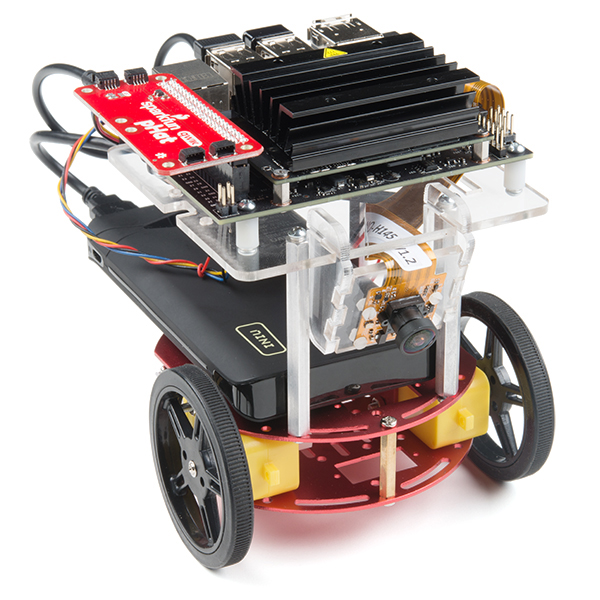
Completed SparkFun Jetbot

Note: We recommend that you read all of the directions first, before building your Jetbot. However, we empathize if you are just here for the pictures & a general feel for the SparkFun Jetbot. We are also those people who on occasion void warranties & recycle unopened instructions manuals. However, SparkFun can only provide support for the instructions laid out in the following pages.

Attention: The SD card in this kit comes pre-flashed to work with our hardware and has the all the modules installed (including the sample machine learning models needed for the collision avoidance and object following examples). The only software procedures needed to get your Jetbot running are steps 2-4 from the Nvidia instructions (i.e. setup the WiFi connection and then connect to the Jetbot using a browser). Please DO NOT format or flash a new image on the SD card; otherwise, you will need to flash our image back onto the card.

If you accidentally make this mistake, don’t worry. You can find instructions for re-flashing our image back onto the SD card in the software section of the guide

The Jetson Nano Developer Kit offers extensibility through an industry standard GPIO header and associated programming capabilities like the Jetson GPIO Python library. Building off this capability, the SparkFun kit includes the SparkFun Qwiic pHat for Raspberry Pi, enabling immediate access to the extensive SparkFun Qwiic ecosystem from within the Jetson Nano environment, which makes it easy to integrate more than 30 sensors (no soldering and daisy-chainable).


The SparkFun Qwiic Connect System is an ecosystem of I2C sensors, actuators, shields and cables that make prototyping faster and less prone to error. All Qwiic-enabled boards use a common 1mm pitch, 4-pin JST connector. This reduces the amount of required PCB space, and polarized connections mean you can’t hook it up wrong.


Materials
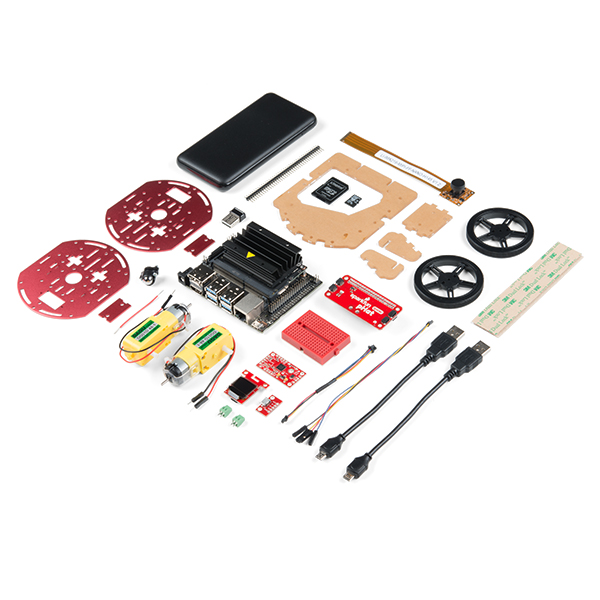
SparkFun Jetbot parts

The SparkFun Jetbot Kit contains the following pieces; roughly top to bottom, left to right.

PartQty
Circular Robotics Chassis Kit (Two-Layer)1
Lithium Ion Battery Pack – 10Ah (3A/1A USB Ports)1
Ball Caster Metal – 3/8″1
Edimax 2-in-1 WiFi and Bluetooth 4.0 Adapter1
Header – male – PTH – 40 pin – straight1
2 in – 22 gauge solid core hookup wire (red)1
Shadow Chassis Motor (pair)1
Jetson Dev Kit (Optional)1
SparkFun JetBot Acrylic Mounting Plate1
SparkFun Jetbot image (Pre Flashed)1
Leopard Imaging 145 FOV Camera1
Screw Terminals 2.54mm Pitch (2-Pin)2
SparkFun Micro OLED Breakout (Qwiic)1
SparkFun microB USB Breakout1
SparkFun Serial Controlled Motor Driver1
Breadboard Mini Self-Adhesive Red1
SparkFun Qwiic HAT for Raspberry Pi1
SparkFun JetBot Acrylic sidewall for camera mount2
SparkFun JetBot Acrylic Camera mount & 4x nylon mounting hardware1
Qwiic Cable – 100mm1
Qwiic Cable – Female Jumper (4-pin)1
Wheels & Tires – included as part of circular robotics chassis2
USB Micro-B Cable – 6″2
Dual Lock Velcro1
SparkFun Jetbot included hardware

The SparkFun Jetbot Kit contains the following hardware; roughly top to bottom, left to right.

PartQty
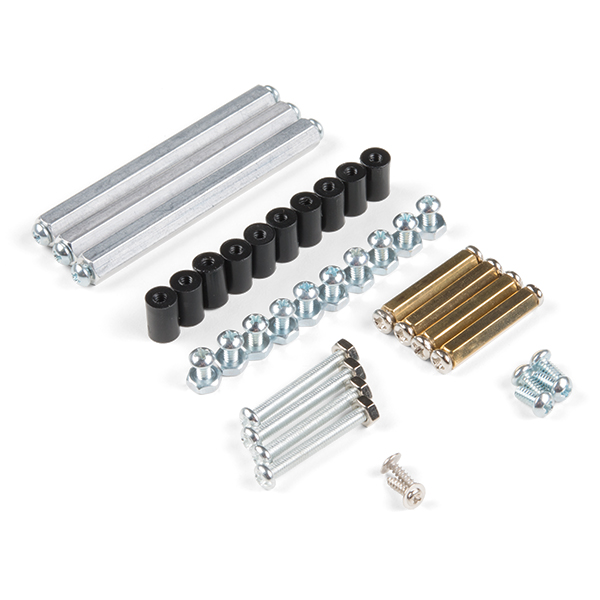
Hex Standoff #4-40 Alum 2-3/8″3
Standoff – Nylon (4-40; 3/8in.)10
1/4″ Phillips Screw with 4-40 Thread20
Machine Screw Nut – 4-4010
Circular Robotics Chassis Kit (Two-Layer) Hardware1

Recommended Tools

We did not include any tools in this kit because if you are like us you are looking for an excuse to use the tools you have more than needing new tools to work on your projects. That said, the following tools will be required to assemble your SparkFun Jetbot.

  • Small phillips & small flat head head screwdriver will be needed for chassis assembly & to tighten the screw terminal connections for each motor. We reccomend the Pocket Screwdriver Set; TOL-12268.
  • Pair of scissors will be needed to cut the adhesive Dual Lock Velcro strap to desired size; recommended, but not essential..
  • Soldering kit for assembly & configuration of the SparkFun Serial Controlled Motor Driver – example TOL-14681
  • Optional– adjustable wrench or pliers to hold small components (nuts & standoffs) in place while tightening screws; your finger grip is usually enough to hold these in place while tightening screws & helps to ensure nothing is over tightened.A Note About Directions

When we talk about the ”front,” or ”forward” of the JetBot, we are referring to direction the camera is pointed when the Jetbot is fully assembled. ”Left” and ”Right” will be from the perspective of the SparkFun Jetbot.
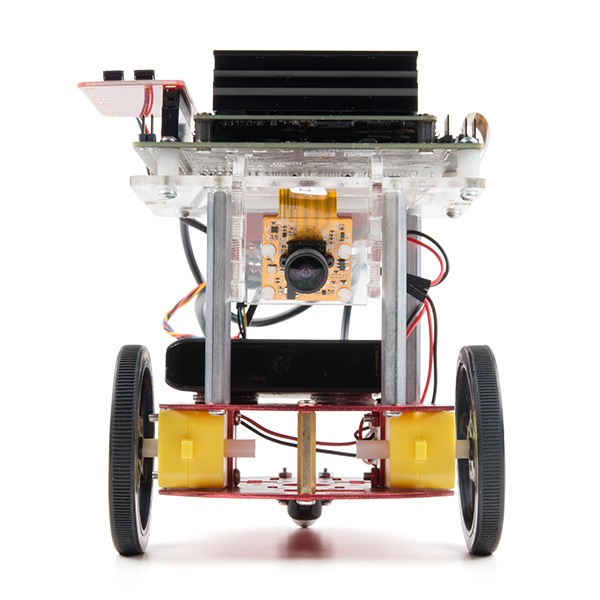
Front of Jetbot

1. Circular Robotics Chassis Kit (Two-Layer) Assembly

If you prefer to follow along with a video, check out this feature from the chassis product page. You do not need to use the included ball caster as a larger option has been provided for smoother operation.

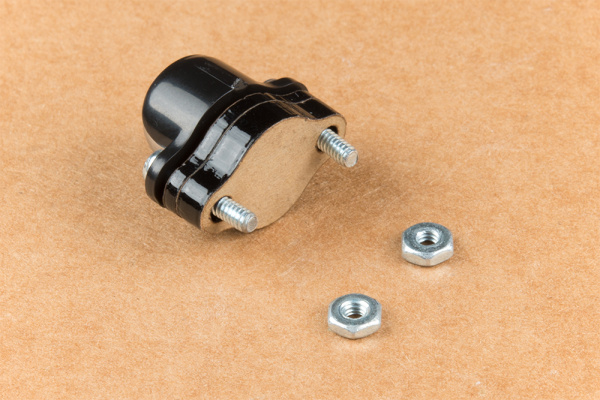
Start by attaching the chassis motor mount tabs to each of the ”Shadow Chassis Motors (pair)” using the long threaded machine screws & nuts included with the Circular Robotics Chassis Kit.
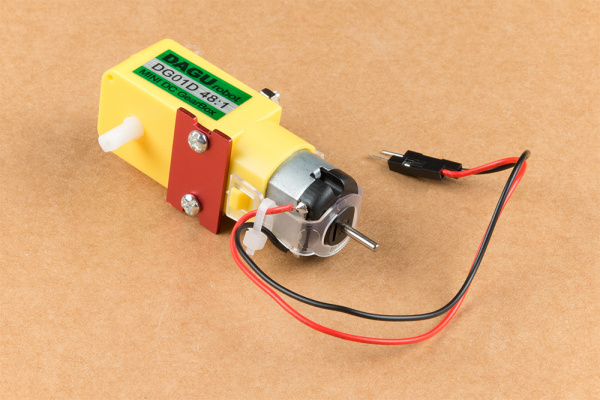
Hobby motor and mount

Fit the rubber wheels onto the hubs, install the wheel onto each motor, & fix them into position using the self tapping screws included with the Circular Robotics Chassis Kit.
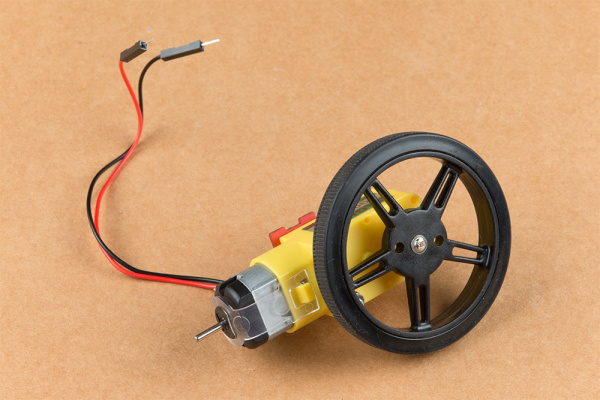
hobby motor with wheel

Install the brass colored standoffs included with the Circular Robotics Chassis Kit; two in the rear and one in the front. The rear of the SparkFun Jetbot will be on the side of the plate with the two ”+” sign cut outs. The rear of the motor will be opposite the wheel where the spindle extends. This orientation ensures the widest base & most stable set up for your Jetbot.
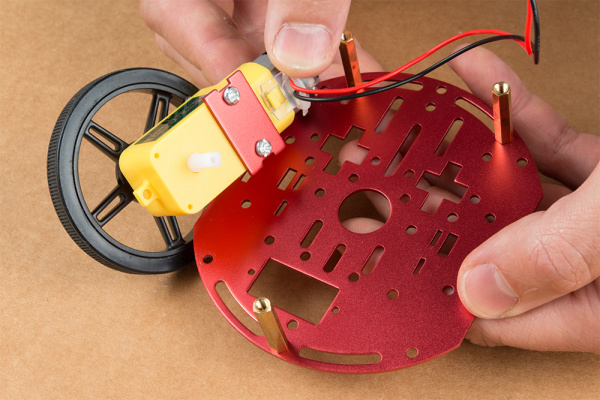
motor mount to plate

The motor mounts fit into two mirrored inlets in each base plate as shown. Install the motors opposite of one another.
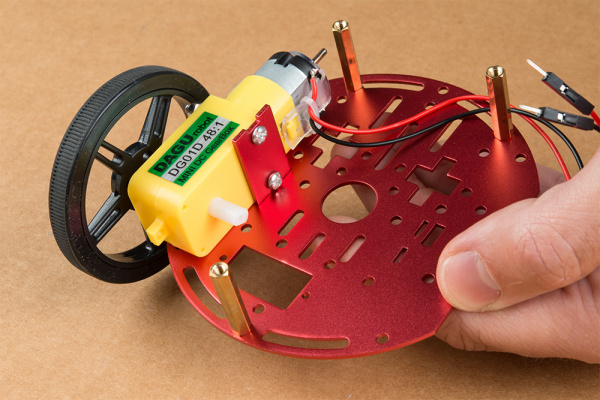
install standoffs

Depending on how you install the motor mounts to each motor will dictate how the motor can be installed on the base plate. Note: Do not worry about the motor orientation as you will determine proper motor operation in how you connect the motor leads to the SparkFun Serial Controlled Motor Driver. Notice how in the picture below one motor has the label facing up, while the other has the label facing down.
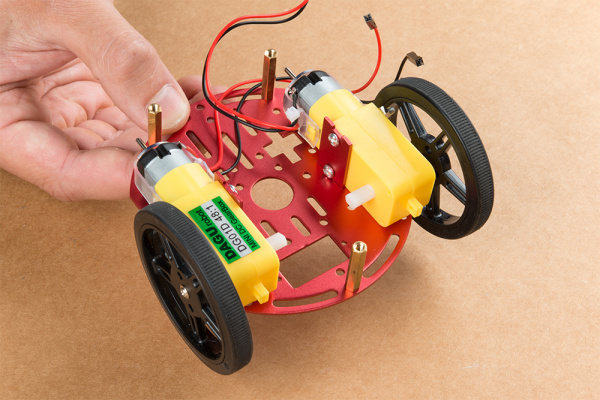
both motors on plate and standoffs

Place the other circular robot chassis plate on top of and align the two ”+” and the motor mount tab recesses. Hold the sandwiched chassis together with one hand and install the remaining Phillips head screws included with the Circular Robotics Chassis Kit through the top plate & into the threaded standoffs.
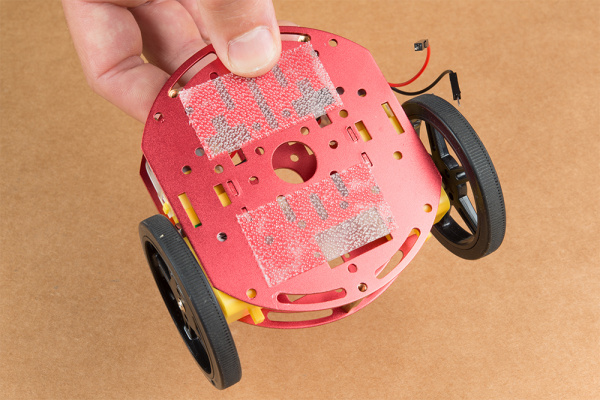
install top plate

Your main chassis is now assembled! The Circular Robotics Chassis Kit also contains a very small caster wheel assembly, but we have included a larger metal caster ball to increase the stability of the SparkFun Jetbot. We will cover the installation of this caster ball later in the tutorial.
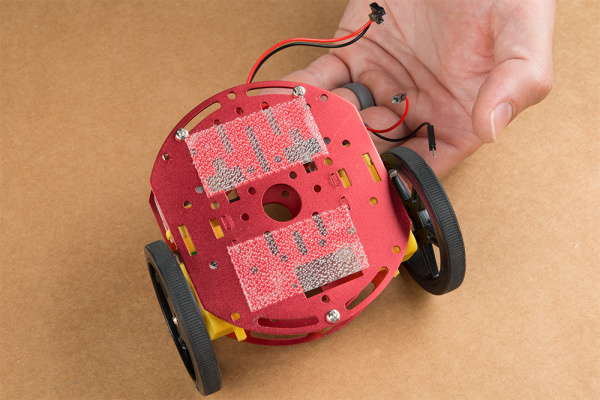
screw install top plate

Utilize three of the included 1/4 in 4-40 Phillips Screws through the top chassis plate with threads facing up & install the 2-3/8 in #4-40 Aluminum Hex Standoff until they are finger tight.
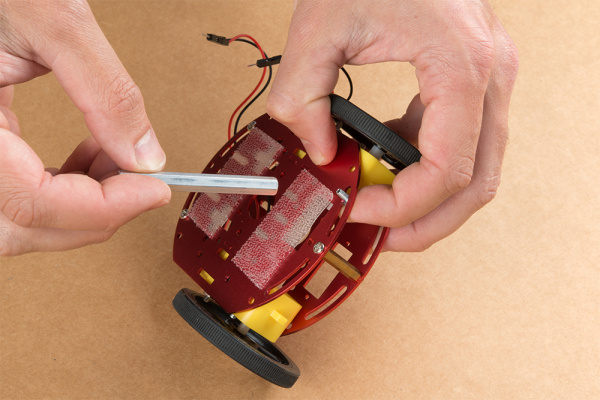
install tall standoffs

The aluminum stand offs should be pointing up as shown below.
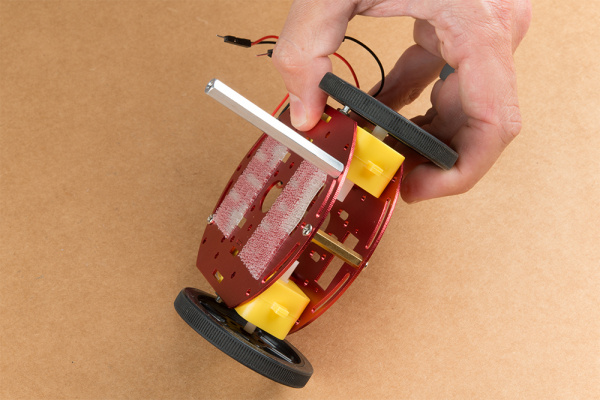
Standoff installed

The SparkFun JetBot acrylic mounting plate is designed to have two of these aluminum standoffs in the front & one in the rear. We recommend the rear standoff on the left side of the chassis (as shown) so the 6 in microB usb cables that will be installed later can more easily span the gap needed to power the JetBot.
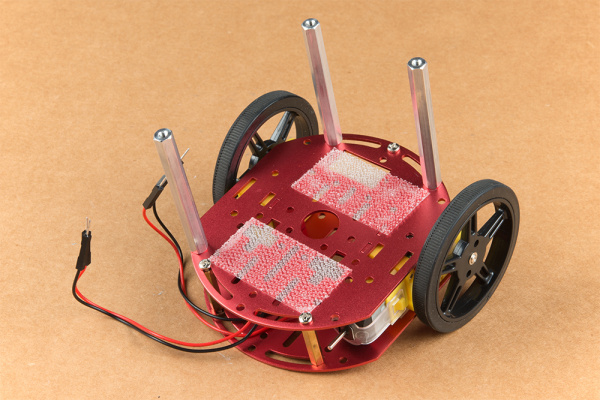
all standoffs installed

Un-package the 3/8 in Metal Caster Ball and thread the mounting screws through all pieces as shown. Note the full stack height will help balance the Jetbot in a stable position.
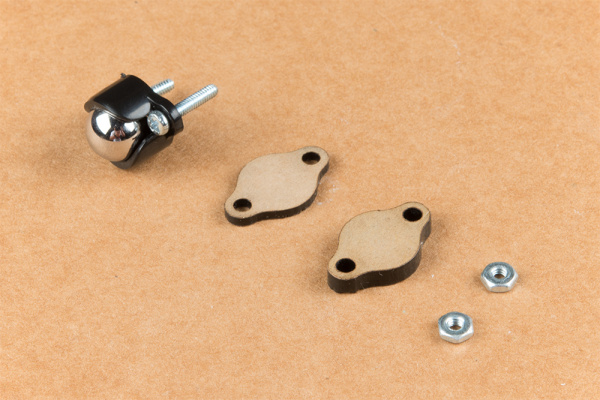
caster wheel assembly
more caster wheel assembly

Install the caster wheel using the Phillips head screws and nuts included with the 3/8 in caster ball assembly. The holes on the caster assembly are spaced to fit snug on the innermost segment of the angular slots near the rear of the lower plate on the JetBot chassis. Again, hand tight is just fine. Note: if you over tighten these screws it will prevent the ball from easily rotating in the plastic assembly. However, too loose and it may un-thread; go for what feels right
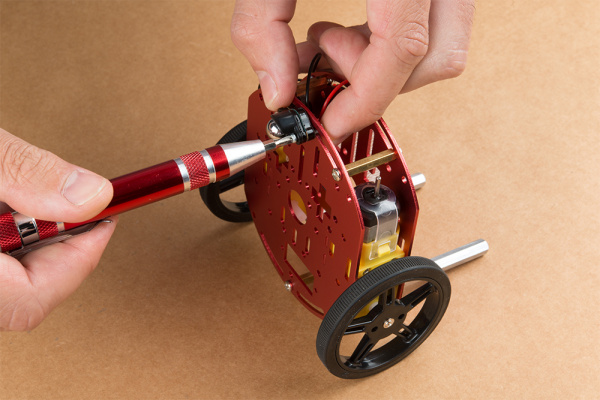
caster install to chassis

After you have installed the caster & aluminum standoffs, thread the motor wires through the back of the chassis standoffs for use later.
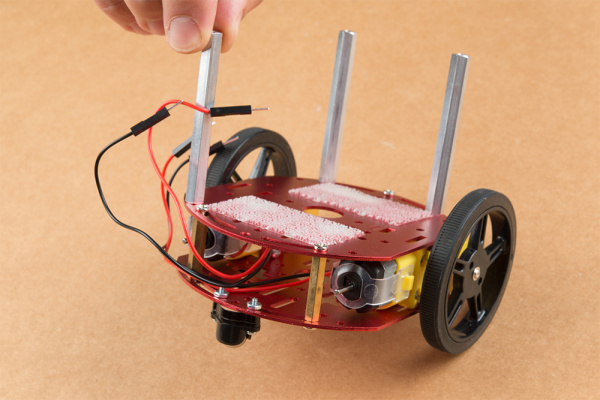
Completed chassis

2. Camera Assembly & Installation

Unpackage the Leopard Imaging camera & align the four holes in the acrylic mounting plate with those on the camera.

Note: ensure that the ribbon cable is extending over the acrylic plate on the edge that does not have mounting holes near the edge; as shown below.

Place all four nylon flathead screws through the camera & acrylic mounting plate prior to fully tightening the nylon nuts. This will ensure equal alignment across all four screws. Tighten the screws while holding the nuts with finger pressure in a rotating criss cross pattern; similar to how you tighten lug nuts on a car rim.
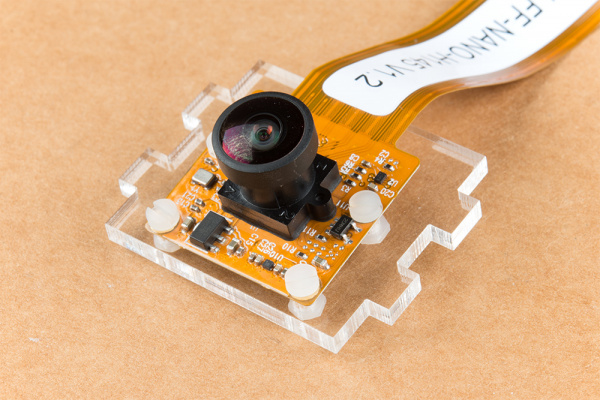
Camera to mount

Align one acrylic sidewall with the camera mounting plate as shown below ensuring that the widest section of the sidewall is oriented to the top of the camera mount where the ribbon cable extends.
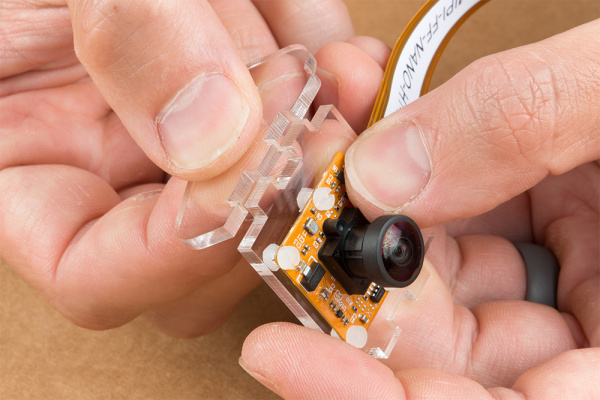
camera sidewall install

Apply even pressure on each piece until they fit together. Note: these pieces are designed to have an interference fit and will have a nice, satisfying ”click” when they fit together.
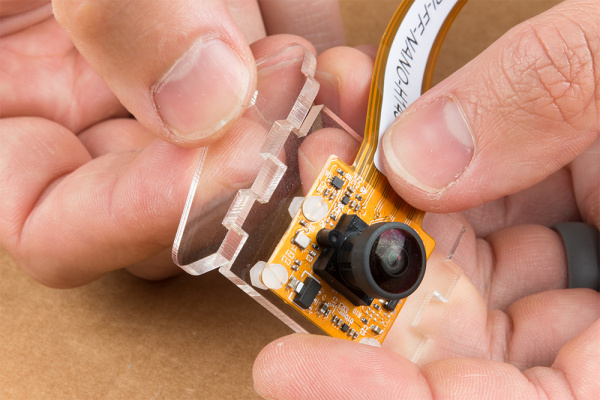
camera sidewall complete

Repeat this process on the other side to fully assemble the camera mount.
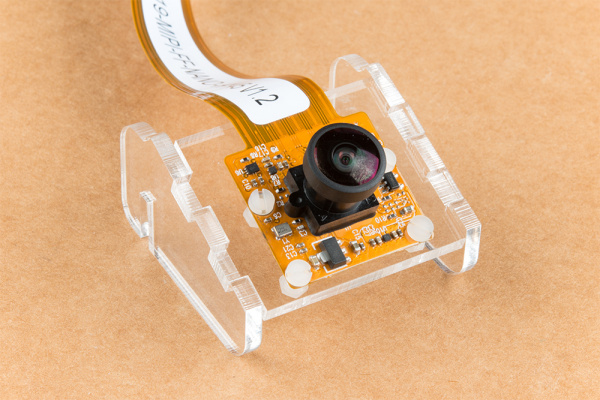
fully assembled camera

The camera mount should now be installed to the SparkFun Jetbot acrylic mounting plate using the overlapping groove joints. Ensure that the cut out on the acrylic mounting plate is facing towards the front/right of the Jetbot as shown. This will ensure that there is plenty of room for the camera ribbon cable to pass around the assembly and up to the Jetson nano camera connector.
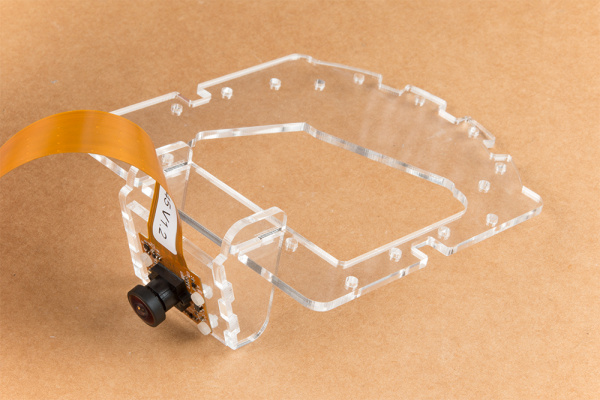
camera mount to plate

Install four of the nylon standoffs to the top of the SparkFun Jetbot acrylic mounting plate using four of the included 1/4 in 4-40 Phillips head screws as shown below.
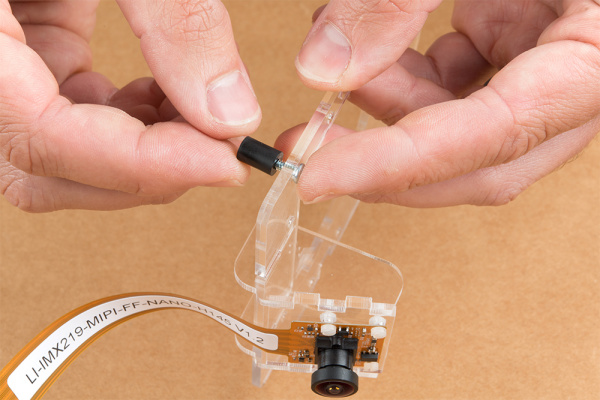
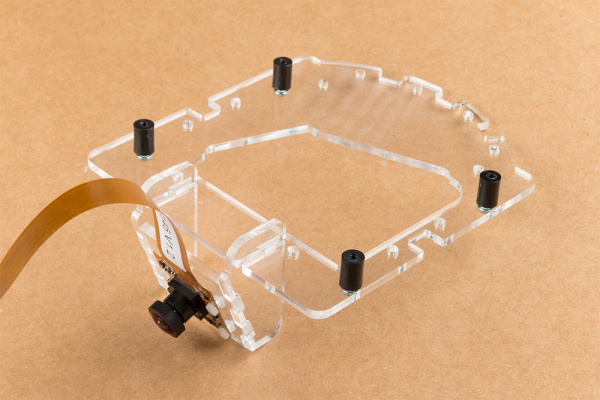
Jetson Nano standoffs to plate
all standoffs on plate

Utilize three more of the 1/4 in 4-40 Phillips head screws to install the SparkFun Jetbot acrylic mounting plate to the aluminum standoffs extending from the Two-layer circular robotics chassis as shown below.
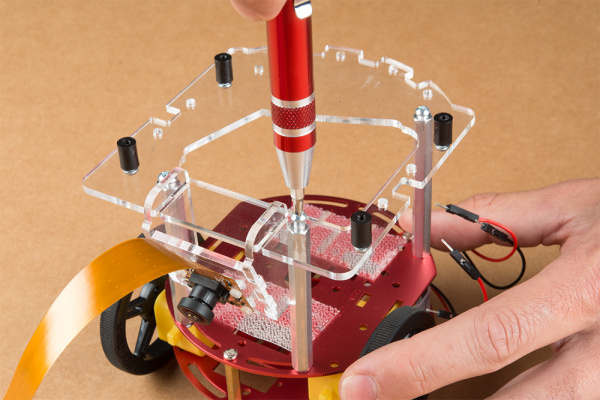
install camera plate to chassis

3. Motor Driver Assembly & Configuration

To get started, make sure that you are familiar with the SparkFun Serial Controlled Motor Driver Hookup Guide.

We also recommend a detailed review of the Hardware Overview of the SparkFun Serial Controlled Motor Driver Here.
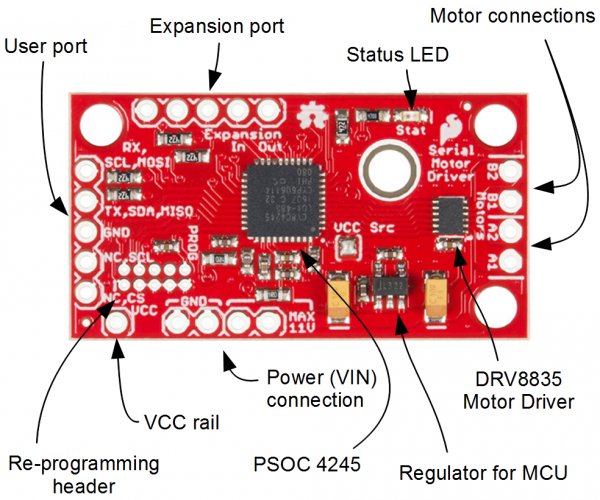
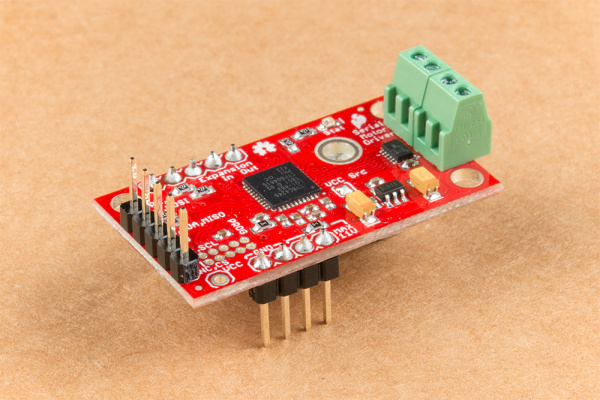
Annotated front SparkFun Serial Controlled Motor Driver

You will need to solder both triple jumpers labeled below as ”I2C pull-up enable jumpers” as the SparkFun pHat utilizes the I2C protocol. The default I2C address that is used by the pre-flashed SparkFun Jetbot image is 0x5D which is equavalent to soldering pad #3 noted as ”configuration bits” on the back of the SparkFun serial controlled motor driver; see below. You will need to create a solder jumper on pad #3 only for the SparkFun Jetbot Image to work properly.
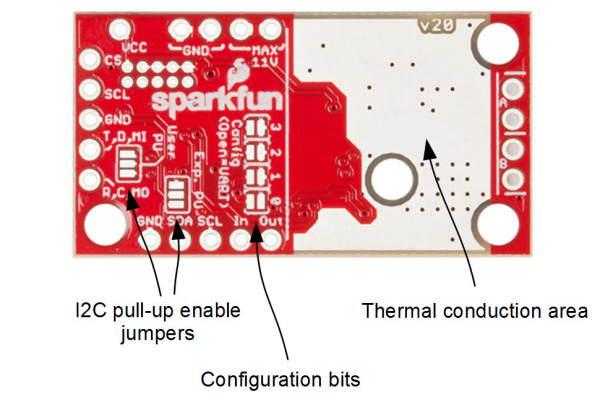
Annotated rear SparkFun Serial Controlled Motor Driver

Layout of jumpers on the Serial Controlled Motor Driver.
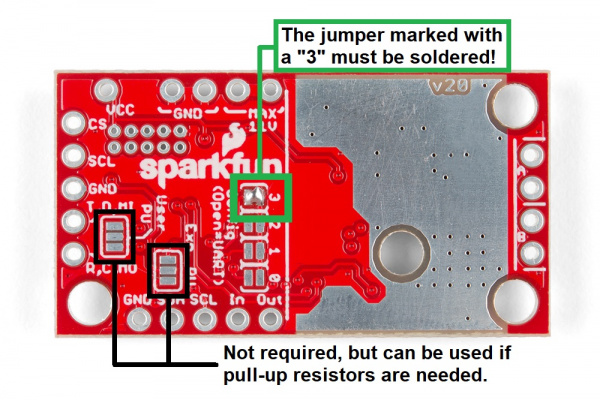
Properly Jumpered SCMD

Jumper 3 of theConfiguration Bitsproperly soldered.

Your completed Serial Controlled motor drive should look somewhat similar to the board shown below.

  • The 2-pin screw terminals are soldered to the ”Motor Connections.”
  • Break off 4 Male PTH straight headers and solder into the ”Power (VIN) connection” points.
  • Break off 5 Male PTH straight headers and solder into the ”Expansion port” points. These will not be used, but will provide additional board stability when installed into the mini breadboard.
  • Break off 5 Male PTH straight headers and solder into the ”User port” points for connection into the included Female Jumper Qwiic cables.
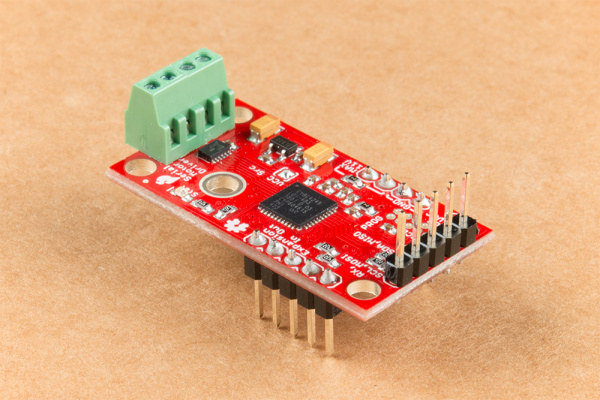
completed motor driver
completed motor driver 2

Break off 5 Male PTH straight headers and solder into the breakout points on the SparkFun microB USB Breakout.

Install both the SparkFun Serial Controlled Motor Driver & the SparkFun microB Breakout board on the included mini breadboard so the ”GRD” terminals for each unit share a bridge on one side of the breadboard.

Utilize the included 2 in – 22 gauge solid core hookup wire (red) to bridge the ”VCC” pin for the SparkFun microB Breakout to either (VIN) connection point on the SparkFun Serial Controlled Motor Driver as shown below.
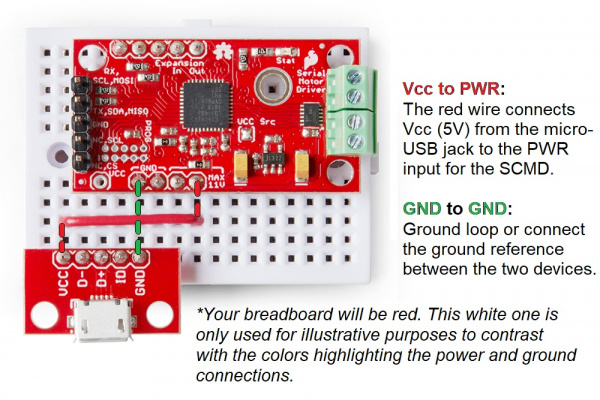
motor driver and usb to breadboard

Required power connections between the micro-USB breakout and the Serial Controlled Motor Driver.
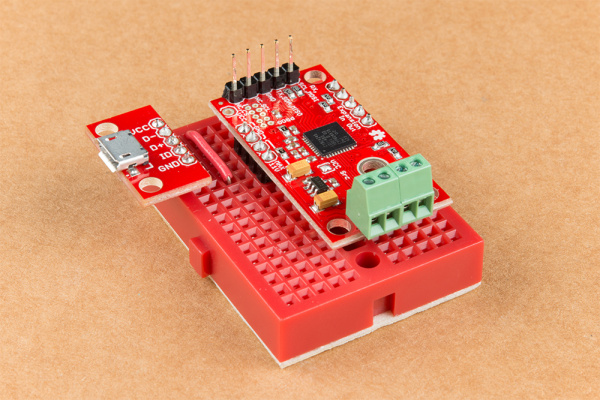
motor driver and usb to breadboard

Competed assembly of the micro-USB breakout and Serial Controlled Motor Driver on the breadboard.

Utilize a small flat head screwdriver to loosen the four connection points on the screw terminals. When inserting the motor connection wires, note the desired output given the caution noted in section #1 of this assembly guide.

Note from section #1: Do not worry about the motor orientation as you will determine proper motor operation in how you connect the motor leads to the SparkFun Serial Controlled Motor Driver.

These connection points can be corrected when testing the robot functionality. If your Jetbot goes straight when you expect Jetbot to turn or vice versa, your leads need to be corrected.
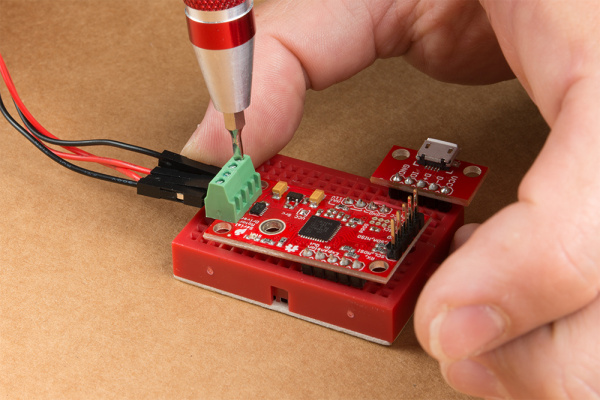
motor cables to motor driver

Set this assembly aside for full installation later.

4. Accessory Installation to Main Chassis

Align the mounting holes on the SparkFun Micro OLED (Qwiic) with those on the back of the SparkFun Jetbot acrylic mounting plate. Install the Micro OLED using two 1/4 in 4-40 Phillips head screws and two 4-40 machine screw nuts.
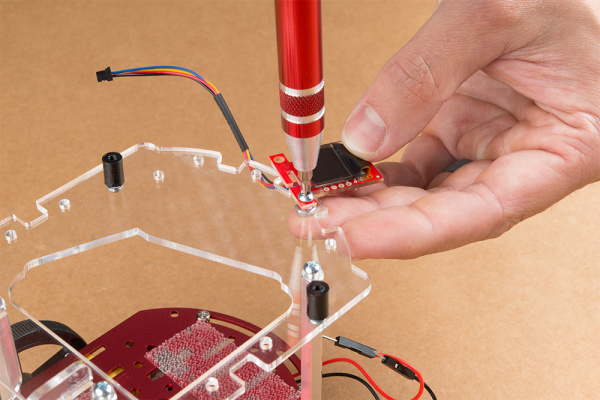
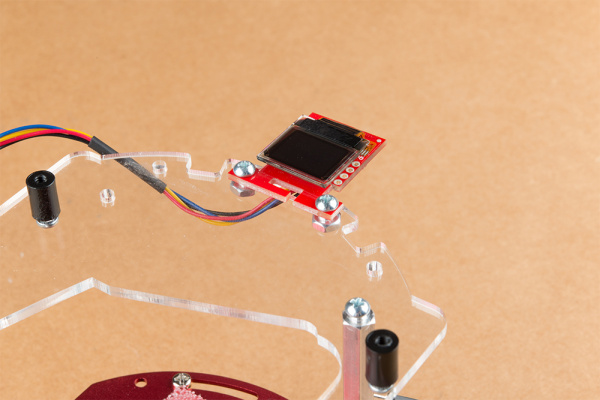
qwiic oled to chassis
completed qwiic oled to chassis

Thread the ribbon cable of the Leopard imaging camera back through the acrylic mounting plate and half-helix towards the left side of the Jetbot.
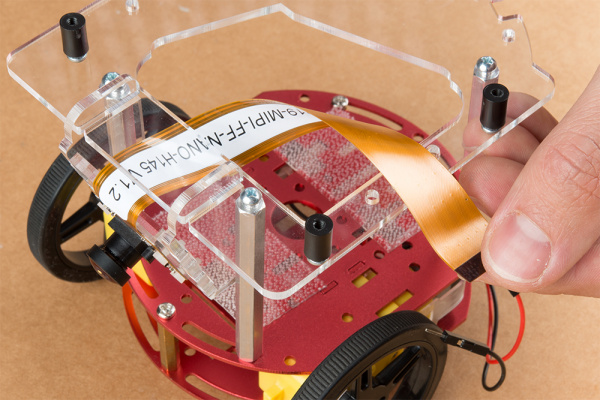
camera ribbon cable threading

Install the Jetson Nano Dev kit to the nylon standoffs using four 1/4 in 4-40 Phillips head screws. Tighten each screw slightly in a criss-cross pattern to ensure the through holes do not bind during install until finger tight. Make sure you can still access the camera ribbon cable.
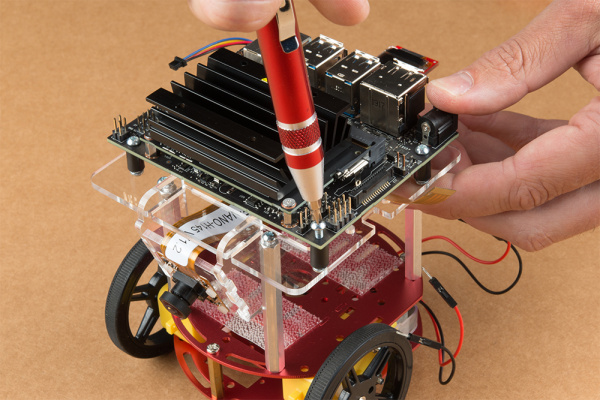
Jetson Nano install

Note: the camera connector is made from small plastic components & can break easier than you think. Please be careful with this next step.

Loosen the camera connector with a fingernail or small flathead screwdriver. Fit the ribbon cable into this connector and depress the plastic press fit piece of the connector to hold the ribbon cable in place.
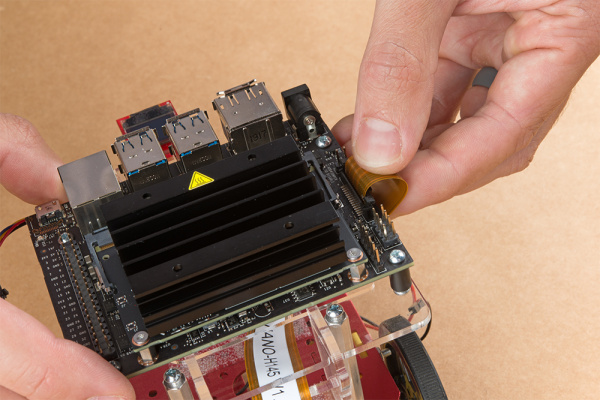
camera attachment to Jetson Nano

Unpackage & install the USB Wifi adaptor into one of the USB ports on the Jetson nano Dev Kit. The drivers for this Wifi adaptor are pre-installed on the SparkFun Jetbot image. If you are making your own image, you will need to ensure you get these from Edimax.
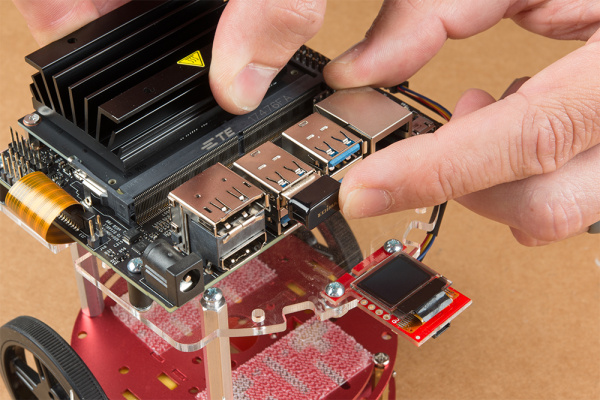
USB wifi install to Jetson Nano

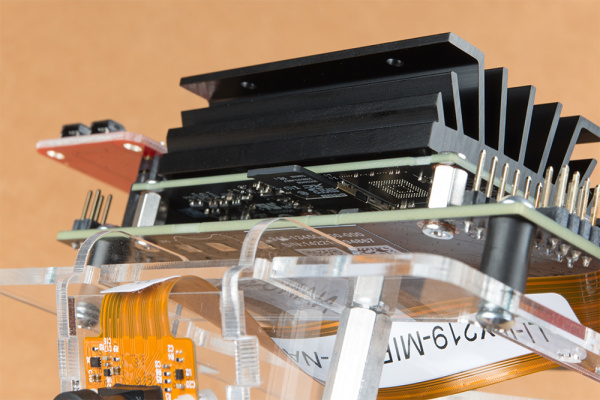
Align the SparkFun pHat with the GPIO headers on the Jetson Nano Dev Kit so that the pHat overhangs the right hand side of the Jetbot. For additional information on hardware assembly of the SparkFun pHat, please reference the hookup guide here.

Note: The heatsink on the Jetson Nano Dev Kit will only allow for one orientation of the SparkFun pHat.
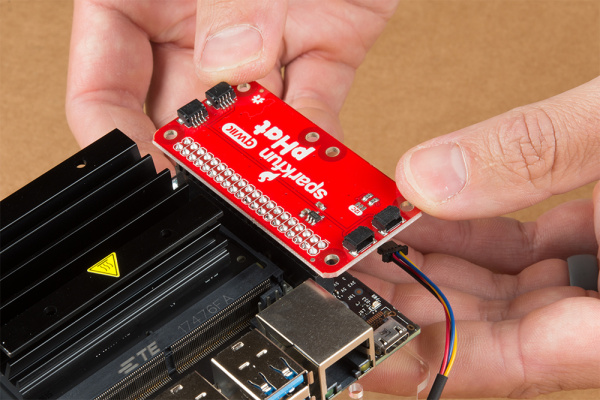
PHat installation

Wrap the motor wires around the rear/left standoff to take up some of the slack; one or two passes should do. Peel the cover off the self adhesive backing on the mini breadboard you set aside at the end of section #3.
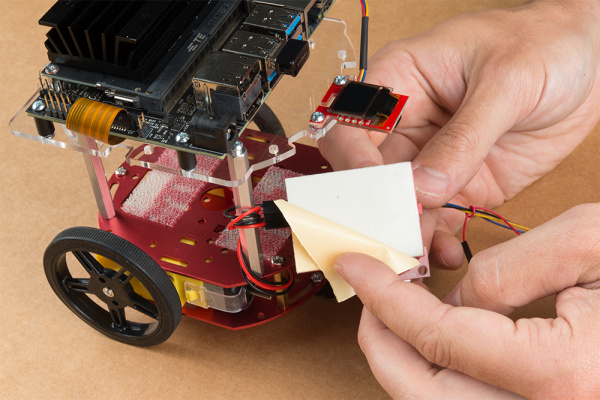
breadboard installation to chassis

Place the breadboard near the back of the Jetbot Acrylic mounting plate where there is good adhesion & access to all the components. Attach the (4-pin) Female Jumper Qwiic cable to the SparkFun Serial Controlled Motor Driver pins as shown. Yellow to ”SCL,” Blue to ”SDA,” Black to ”GND.”
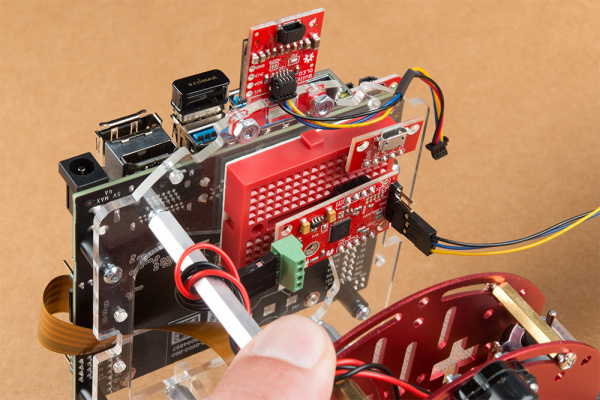
breadboard placement on chassis and qwiic cable to motor driver

Daisy chain the polarized Qwiic connector on the other end of the (4-pin) Female Jumper Qwiic cable into the back of the SparkFun Micro OLED (Qwiic).
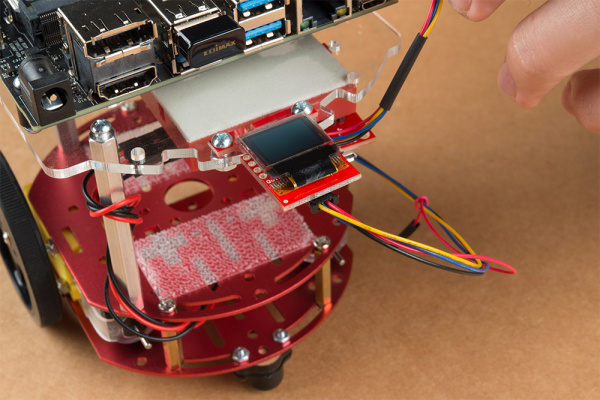
Qwiic cable installation

Using the 100mm Qwiic Cable attach the SparkFun Micro OLED front Qwiic connector to the SparkFun pHat as shown.
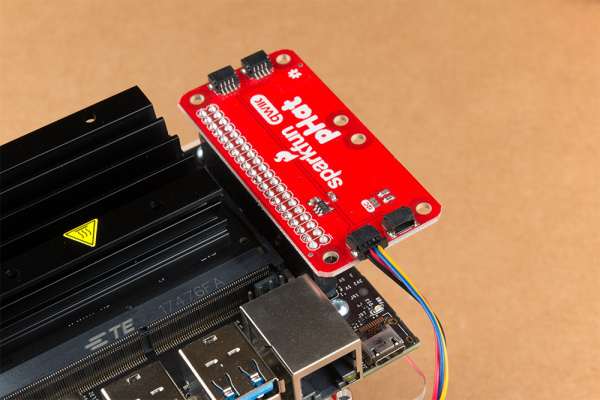
Qwiic install to PHat board

Cut the Dual Lock Velcro into two pieces and align them on the 10Ah battery & top plate of the Two-Layer Circular Robotics Chassis as shown below. Ensure that the USB ports on the battery pack are pointing out the back of the Jetbot. Additionally, the orange port (3A) will need to power the Jetson Nano Dev Kit & therefore will need to be on the right side of the Jetbot.
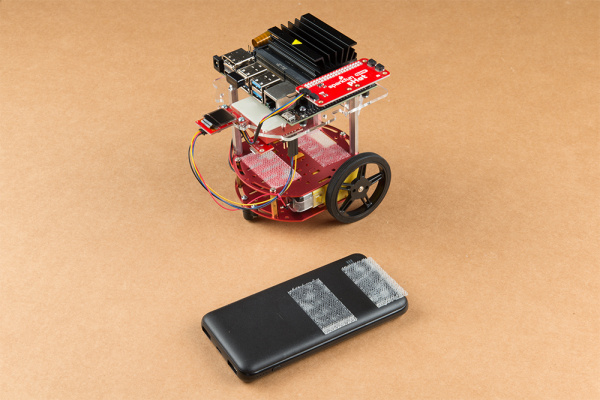
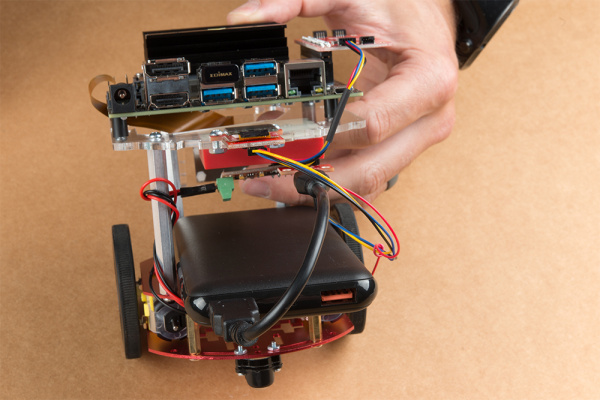
battery pack Velcro placement
Note high amp usb socket

Apply firm pressure to the battery pack to attach to the Jetbot chassis via the Dual Lock Velcro.
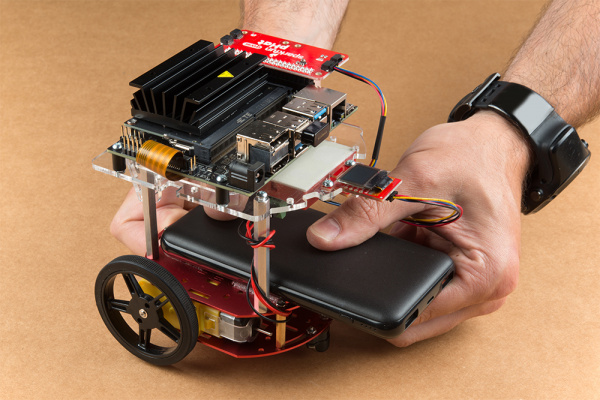
battery pack installation

Remove the micro SD card from the SD card adapter.
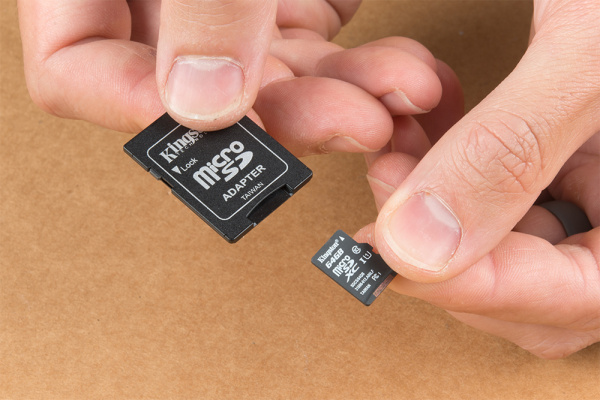
micro SD card

Insert the micro SD card facing down into the micro SD card slot on the front of the Jetson Nano Dev Kit. Please see the next three pictures for additional details.
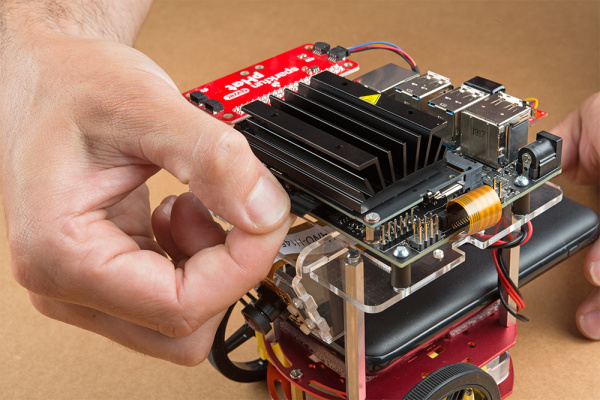
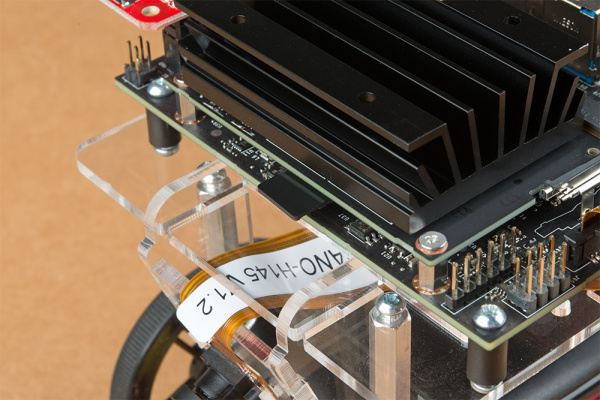
install image into SD card slot on Jetson
Card in SD slot
Card in SD clost underview

The USB ports on the back of the 10Ah battery pack has two differently colored ports. The black port (1A) is used to power the motor driver via the SparkFun microB breakout. Utilize one of the 6 in micro-B USB cables to supply power to the microB breakout.
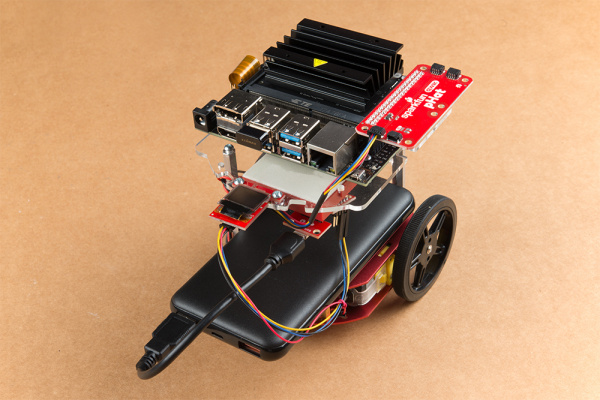
USB power motor drivers low amp
Note high amp usb socket

Note: Once you plug the Jetson Nano Dev Kit into the 3A power port, this will ”Boot Jetson Nano” which is not covered in detail until the links in section #5 of this assembly guide. Do not proceed unless you are ready to move forward with the software setup & examples provided by NVIDIA.

The orange port (3A) is used to power the Jetson Nano Dev Kit. Utilize the remaining 6 in micro-B USB cable to supply power to the Jetson Nano Dev Kit.
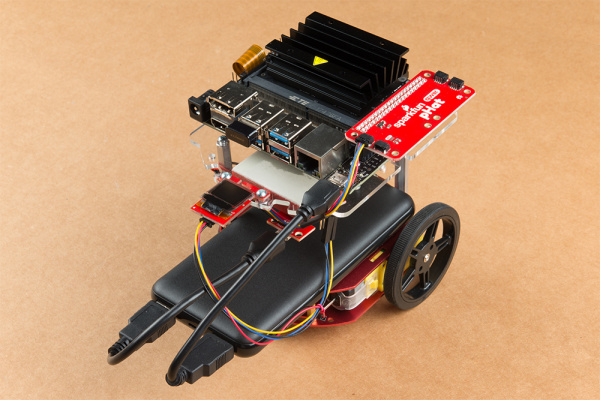
Final usb cable install

Congratulations! You have fully assembled your SparkFun JetBot AI Kit!

5. Software Setup Guide from NVIDIA

Attention: The SD card in this kit comes pre-flashed to work with our hardware and has the all the modules installed (including the sample machine learning models needed for the collision avoidance and object following examples). The only software procedures needed to get your Jetbot running are steps 2-4 from the Nvidia instructions (i.e. setup the WiFi connection and then connect to the Jetbot using a browser). Please DO NOT format or flash a new image on the SD card; otherwise, you will need to flash our image back onto the card (instructions below).

Your SparkFun Jetbot comes with a Pre-Flashed micro SD card. Users only need to plug in the SD card and set up the WiFi connection to get started.

  • The default password on everything (i.e. login/user, jupyter notebook, and superuser) is ”jetbot”.
  • We recommend that users change their passwords after initial setup. These are typically covered on the first boot of your Jetson Nano as detailed in the NVIDIA Getting Started with Jetson Nano walkthrough

Software Setup

The only steps needed to get your Jetbot kit up and running is to log into the Jetbot and setup your WiFi connection. Once that is done, you are now ready to connect to the Jetbot wirelessly. If you need instructions for doing so, you can use the link below.However, please take note of our instructions below. You will want to skip steps 1 and 5 to avoid erasing the image on the card or undoing the hardware configuration.NVIDIA JETBOT WIKI SOFTWARE SETUP

Instructions

  1. Skip step 1 of Nvidia’s instructions: It references how to flash your SD card, so feel free to skip to Step 2 – Boot Jetson Nano.

Note: Following Step 1 will erase the pre-flashed image and make a lot of extra work for yourself.

  1. Skip step 5 of Nvidia’s instructions: This step should already be setup on the pre-flashed SD card.

Get and install the latest JetBot repository from GitHub by entering the following commands

COPY CODEgit clone https://github.com/NVIDIA-AI-IOT/jetbot
cd jetbot
sudo python3 setup.py install

Note:Running sudo python3 setup.py install in the command line will overwrite the software modifications for SparkFun’s hardware in the kit.

Troubleshooting

In the event that you accidentally missed the instructions above, here are instructions to get back on track.

Re-Flashing the SD card

If you need to re-flash your SD card, follow the instructions from Step 1 Nvidia’s guide. However, download and use our image instead (click link below).DOWNLOAD SPARKFUN’S JETBOT IMAGENote: Don’t forget to uncompress (i.e. unzip, extract, or expand) the file from the .zip file/folder first. You should be pointing the ”flashing” software to an ~62GB .img file to flash the image (sparkfun_jetbot_v01-00.img) onto the SD card.

Alternatively, there are other options for flashing images onto an SD card. If you have a preferred method, feel free to use the option you are most comfortable with.

Re-Applying the Software Modifications

If you have accidentally, overwritten the software modifications for the hardware included in your kit, you will need to repeat Step 5 from Nvidia’s guide from the desktop interface (if you are comfortable performing the following steps from the command line, feel free to do so).

Skip steps 1 and 2: Plug in a keyboard, mouse, and monitor. Then log in to the desktop interface (if you haven’t changed your password, the default password is: jetbot).

Follow step 3: Launch the terminal. There is an icon on sidebar on the left hand side. Otherwise, you can use the keyboard short cut (Ctrl + Alt + T).

Follow step 4: However, before you execute sudo python3 setup.py install you will want to copy in our file modifications to the jetbot directory you are in.

  1. Begin by downloading our files (click link below).

DOWNLOAD MODIFICATION FILES

  1. Next, extract the file.
  2. Next, replace the files in the jetbot folder. The file paths must be the same, so make sure to overwrite files exactly.

Click on the icon that looks like a filing cabinet on the left hand side of the GUI. This is your Home directory. From here, you will need to proceed into the jetbot folder. There you will find a jetbot folder with similar files to the ones you just extracted. Delete the folder and copy in our files (you can also just overwrite the files as well).

  1. Now, you can execute sudo python3 setup.py install in the terminal.

Follow step 5: Finish up by following step 5. Now you are back on track to getting your Jetbot running again!

6. Examples

The ”object following” jupyter notebook example won’t work due to the required dependencies that had not been released by NVIDIA prior to the creation of the SparkFun JetBot image. These updates can be manually installed on your Jetson Nano with the JetPack 4.2.1 release.

Update: The engine generated for the example utilized a previous version of TensorRT and is therefore, not compatible with the latest release. For more details on this issue, check out the following GitHub issue.NVIDIA JETBOT WIKI EXAMPLES

Resources and Going Further

Now that you’ve successfully got your JetBot AI up and running, it’s time to incorporate it into your own project!

For more information, check out the resources below:

Need some inspiration for your next project? Check out some of these related tutorials:

Easy Driver Hook-up Guide

Get started using the SparkFun Easy Driver for those project that need a little motion.

Servo Trigger Hookup Guide

How to use the SparkFun Servo Trigger to control a vast array of Servo Motors, without any programming!

SparkFun 5V/1A LiPo Charger/Booster Hookup Guide

This tutorial shows you how to hook up and use the SparkFun 5V/1A LiPo Charger/Booster circuit.

Wireless Remote Control with micro:bit

In this tutorial, we will utilize the MakeCode radio blocks to have the one micro:bit transmit a signal to a receiving micro:bit on the same channel. Eventually, we will control a micro:bot wirelessly using parts from the arcade:kit!

Mäta CO2 och VOC med ESP32

Känner du dig ibland trött under möten eller i skolan?
Har du ibland huvudvärk efter jobbet eller skolan?
Vill du ändra på det? Då kan det vara intressant för dig att mäta skadliga gaser i luften i din arbetsmiljö, vilka kan resultera i både trötthet och huvudvärk.

I filmklippet nedan används en ESP32 och två ESP8266 med sensorer för att bygga ett system som mäter luftkvaliteten. Sensorerna som används är: Winsen MH-Z19, Sensirion SGP30 och SCD30.
I denna video:

  • Fokusera på inomhusklimat
  • Fokusera på gaser där den främsta källan är människor
  • CO2:s påverkan på luftkvaliteten inomhus
  • Se förhållandet mellan CO2-sensorer och global uppvärmning
  • Använd ett annat sätt för att bedöma inomhusluften: VOC eller eCO2
  • Och vi kommer att bygga sensorer för att överföra värden till Grafana

How to measure CO2 and VOC with ESP Microprocessors. Which one is better? (21:12)


Vad kommer folk ha på sig i framtiden?

En ny våg av innovation driver en radikal förändring av mode och textilbranschen. I framtiden kan kläder vara datorer, tillverkade med material designade och odlade i ett labb.

Filmen nedan ger en inblick i det som har kommit att kallas Fashiontech.

Kopiera nedanstående text, klistra in den i din loggbok och läs sedan texten.

Bärbar teknik, data, automatisering och labbodlat material kommer att ha en stor inverkan på vad människor kommer att ha på sig i framtiden.

Sedan sömnaden och vävningen föddes har tekniken alltid lett till utveckling inom mode. Den industriella revolutionen mekaniserade tillverkning som möjliggör massproduktion. På 1960-talet tog syntetiska material som polyester fart och skapade nya möjligheter för mode.

Nu öppnar konvergensen av ny teknik upp tidigare otänkbara möjligheter.
Dr Amanda Parkes är modevetenskapsman och chef för innovation vid FT-labs, ett riskkapitalföretag som främst investerar i modetekniska startups. Hon berättar att det bland dessa nystartade företag handlar om att hitta nästa generation förnybara material som kan odlas i ett labb. Traditionell siden produceras av insektslarver som bildar kokonger, oftast silkesmaskar. Men snarare än att lita på dessa insekter, så skapar bulttrådar silke i provrör. Biotillverkade material tar bort behovet av djur och insekter och det är ett mer hållbart och effektivt sätt att producera råmaterial.

Andra företag skapar läderalternativ. I stället för att använda djur skapar forskare biotillverkade material från ananasblad och till och med svamp. Konvergensen mellan mode och teknik ger också möjligheter att förändra inte bara kläder utan de människor som bär dem.

Myant är ett företag som är banbrytande i skapandet av kläder som kan övervaka alla dina rörelser. Så kallade smarta tyger förutspås bli nästa stora genombrott för bärbar teknik. Garn kombineras med elektroniska sensorer så att viktiga data kan fångas från människokroppen. För att skapa kläder som kan övervaka bärarens hälsa och fitness har Myant samlat team av människor som inte traditionellt har arbetat under samma tak. Smarta tyger kan radikalt förändra konsumenternas relationer till kläderna de bär, men när tekniken ökar förändringstakten, hur kan branschen hålla reda på vad konsumenterna verkligen vill ha?

Francesca Muston är chef för detaljhandeln på WGSN, världens ledande modeprognosbyrå. Personalen här använder big data för att analysera politiska, sociala och miljömässiga trender för att förutsäga morgondagens heta mode. Teknik driver en explosion i konsumentens val såväl som det förvirrande utbudet av kläddesign och skapande. För att textil- och modebranschen ska överleva vänder de sig till tekniken. Maskininlärningsteknologier är nu centrala för modeprognoser, vilket snabbt upptäcker mönster bland den ständigt växande datamängden.

Från bioteknik till demografiska förändringar och att förutsäga trender är inte längre en konst, det har blivit en vetenskap.

Fashiontech produktutveckling

Konstruktion TE18DP

I konstruktionskursens del av Fashiontech-projektet kommer vi jobba med både Elektronikkonstruktion och Mekanisk konstruktion.

Elektronikkonstruktionsarbetet omfattar följande delar:

  • Kravspecifikation/kravbeskrivningar
  • Funktionsspecifikation/funktionsbeskrivning
  • Blockschema
  • Flödesschema/flödesmodeller
  • Kopplingsschema 
  • Kretsschema
  • Kretskortslayout
  • Mönsterkort
  • Anslutningsdon
  • Ledare och kablage
  • Kylning
  • Analog och digital teknik, analoga och digitala komponenter, signaler och kretsar.
  • Logik och Boole’s algebra
  • Funktionstabeller/sanningstabeller
  • Olika talsystem, binära, hexadecimala
  • ASCII-kod och Unicode
  • Prototyper, test och simuleringar
  • Lödning
  • Strömförsörjning och olika batterityper
  • Elektronikproduktion, produktionsmetoder och produktionsteknik
  • Projektdokumentation
  • Projektkommunikation

Lektionsuppgifter v 43:

  1. Bestäm vilken yrkeskategori du vill designa, konstruera och skapa en riktig prototyp av ett Fashiontech-plagg till. Skriv in vilken yrkeskategori du valt (målgrupp) och skriv vilket klädesplagg (produkt) du vill skapa.

2. Skriv en lista på vilka funktioner du tycker att plagget ska ha.
Varje funktion ska lösa någon form av användarbehov. Skriv en funktionsbeskrivning för respektive funktion och vilket behov eller problem den löser.
Gör funktionsbeskrivningen hierarkisk. Först en övergripande beskrivning för respektive funktion, sedan en mer detaljerad beskrivning av funktionerna. Vad gör funktionen? Varför ska den finnas? Hur fungerar den? Hur ska funktionen styras?

3. Gör research.
Sök efter liknande smarta plagg, wearables eller andra produkter som löser samma problem eller tillgodoser de användarbehov du vill adressera med din Fashiontech-produkt. Samla på dig relevant info som du hittar. Lägg in länkar till dina källor och kopiera text och bilder som du anser kan vara bra att ha. Ta gärna med flera olika varianter av varje konkurrerande befintlig produkt du hittar. Ta reda på hur produkterna fungerar, hur de är uppbyggda, konstruerade, vilka material som används, specifikationer och egenskaper m.m.

4. Skapa en komponent-lista till ditt Fashiontech-plagg.
Vilka komponenter tror du kommer behövas för att erhålla önskad funktion?
Gör research; sök efter tänkbara komponenter eller moduler som har de funktioner och egenskaper som du tror behövs. Samla på dig info som du hittar. Lägg in länkar till dina källor. Ta med flera olika varianter av varje komponent. Är du osäker på om din produktidé kommer fungera rent konceptuellt så kan du bygga en prototyp och testa funktionen. Vilka delar/komponenter eller moduler kan du använda för att bygga en fungerande konceptprototyp?

Skriv in vad du behöver för komponenter i denna gemensamma komponentlista:

5. Arbeta med designen av ditt Fashiontech-plagg.
Samla på dig inspirationsbilder och förlagor som du hittar på Internet. Kopiera in dem i din Design-loggbok.
Du kan även börja skissa på hur du vill att ditt Fashiontech-plagg ska se ut (uppgift i kursen Bild och form).

6. Skapa en beskrivande och säljande presentation av ditt Fashiontech-plagg-projekt. I detta läge handlar det inte om att göra reklam för en färdig produkt, utan en presentation av din projektidé. Berätta vad du planerar att göra, lära dig och beskriv funktionerna som det smarta plagget ska ha och vilka problem hos kunderna du försöker lösa.
Denna presentation ska vi lägga upp på www.fashiontech-projects.se efter höstlovet.

Fashiontech – designutmaning

Uppdrag: Ta fram design-idéer till funktionella smarta arbetskläder för olika yrkeskategorier
Syfte: Förbättra klädbärarens arbetsdag genom att förbättra klädernas funktion mha t ex sensorer och annan elektronik.  

Projektwebbsida för presentation av elevernas Fashiontech-produkter: www.fashiontech-projects.se

Brainstorming-övning (enskilt)
Kom på så många funktioner och exempel som möjligt på smarta kläder för de olika yrkeskategorierna och produktkategorierna nedan.
Beskriv vad funktionen ska kunna göra, varför det kan vara bra och vilken typ av komponent som behövs i klädesplagget för att erhålla önskad funktion.

  • Brandman (exempel: temperatursensor …)
  • Polis
  • Byggarbetare
  • Arbetskläder, skyddsutrustning, knäskydd
  • Skyddsskor
  • Skyddshjälmar
  • Handskar
  • Vägarbetare
  • Butikspersonal
  • Kassörska
  • Trädgårdsmästare/Parkarbetare (ex färgsensor i handske)
  • Lastbilschaufför
  • Förskollärare, hålla koll på barnen (ex: fuktsensor i blöja)
  • Skolpersonal, lärare (ex se Vinnova-projekt IoT-Hubb skola)
  • Kontorsarbetare
  • Lagerarbetare
  • Undersköterska på sjukhus
  • Hemtjänstpersonal

Andningen påverkar din hjärna

I nedanstående artikel från Quartz kan vi läsa om hur forskare identifierat vad som händer i vår hjärna under djupandning.

Neuroscientists have identified how exactly a deep breath changes your mind

By Moran Cerf, November 19, 2017, Kellogg School of Management, Northwestern University

Breathing is traditionally thought of as an automatic process driven by the brainstem—the part of the brain controlling such life-sustaining functions as heartbeat and sleeping patterns. But new and unique research, involving recordings made directly from within the brains of humans undergoing neurosurgery, shows that breathing can also change your brain.

Simply put, changes in breathing—for example, breathing at different paces or paying careful attention to the breaths—were shown to engage different parts of the brain.

Humans’ ability to control and regulate their brain is unique: e.g., controlling emotions, deciding to stay awake despite being tired, or suppressing thoughts. These abilities are not trivial, nor do humans share them with many animals. Breathing is similar: animals do not alter their breathing speed volitionally; their breathing normally only changes in response to running, resting, etc. Questions that have baffled scientists in this context are: why are humans capable of volitionally regulating their breathing, and how do we gain access to parts of our brain that are not normally under our conscious control. Additionally, is there any benefit in our ability to access and control parts of our brain that are typically inaccessible? Given that many therapies—Cognitive Behavioral Therapy, trauma therapy, or various types of spiritual exercises—involve focusing and regulating breathing, does controlling inhaling and exhaling have any profound effect on behavior?

This recent study finally answers these questions by showing that volitionally controlling our respirational, even merely focusing on one’s breathing, yield additional access and synchrony between brain areas. This understanding may lead to greater control, focus, calmness, and emotional control.

The study, conducted by my post-doctoral researcher, Dr. Jose Herrero, in collaboration with Dr. Ashesh Mehta, a renowned neurosurgeon at NorthShore University Hospital in Long Island, began by observing brain activity when patients were breathing normally. Next, the patients were given a simple task to distract them: clicking a button when circles appeared on the computer screen. This allowed Dr. Herrero to observe what was happening when people breath naturally and do not focus on their breathing. After this, the patients were told to consciously increase the pace of breathing and to count their breaths. When breathing changed with the exercises, the brain changed as well. Essentially, the breathing manipulation activated different parts of the brain, with some overlap in the sites involved in automatic and intentional breathing.

The findings provide neural support for advice individuals have been given for millennia: during times of stress, or when heightened concentration is needed, focusing on one’s breathing or doing breathing exercises can indeed change the brain. This has potential application to individuals in a variety of professions that require extreme focus and agility. Athletes, for example, have long been known to utilize breathing to improve their performance. Now, this research puts science behind that practice.

Beyond studying the ability of humans to control and regulate their neural activity volitionally, the study was also unique in that it utilized a rare method of neural research: directly looking inside the brains of awake and alert humans. Typical neuroscience studies involving humans use imaging techniques (i.e. fMRI or EEG) to infer the neural activity in people’s brain from outside the skull. But studies involving electrodes implanted in humans’ brains are rare. The ability to look inside the humans’ brains allows us to study thinking, deciding and even imagining or dreaming by directly observing the brain. The study subjects in our work were patients who had electrodes implanted in their brain as part of a clinical treatment for epilepsy. These patients were experiencing seizures that could not be controlled by medication and therefore required surgical interventions to detect the seizure focus for future resection.

Given that detection requires the patient to have a spontaneous seizure in order to identify the exact seizure onset location, which can take days, the patients are kept in the hospital with electrodes continuously monitoring their brain activity.

The research findings show that the advice to “take a deep breath” may not just be a cliché. Exercises involving volitional breathing appear to alter the connectivity between parts of the brain and allow access to internal sites that normally are inaccessible to us. Further investigation will now gradually monitor what such access to parts of our psyche that are normally hidden can reveal.

MiniBit Entry-Level Robot for Microbit

Overview

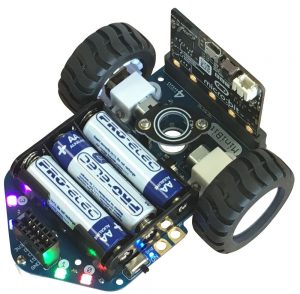
MiniBit is a ready-assembled simple and inexpensive robot for the BBC micro:bit.

It has the following features:

  • Ready-assembled*. Just push on the wheels
  • Edge connector to easily insert the Microbit
  • Micro metal gear motors with fully-enclosed gearbox (no grit or fluff can enter)
  • Wire-free battery holder for 3 x AA batteries
  • 4 x Smart RGB LEDs (neopixel compatible)
  • Integrated Pen holder for 10mm diameter pens (eg. Sharpie felt tips)
  • Robust On/Off switch with Blue indicator LED
  • Wide chunky wheels with lots of grip
  • Metal ball front caster
  • Connector for optional ultrasonic sensor or I2C breakouts (fully compatible with Pimoroni’s Breakout Garden range)
  • The Microbit pins 0, 1, 2, Gnd and 3V are available for use with croc clips etc.
  • Lots of mounting holes to create your own “body” for the robot or additional sensors etc.
  • Makecode extension and micropython examples available

* Wheels need pushing on and optional pen-holder needs screwing in if purchased

Assembly Instructions

  1. Push on the wheels
  2. If you have the pen holder, then use 2 screws to screw the two pillars into the main board from the bottom, then use the remaining 2 screws to screw the top holder into the pillars

Coding Your MiniBit

Microsoft MakeCode

Click any image to enlarge.

To load the extension, select Advanced, then Extensions. Then enter “Minibit” into the search box and press Enter. If that doesn’t find it (there are sometimes earch glitches) you can enter the full URL into the search box: “https://github.com/4tronix/MiniBit”

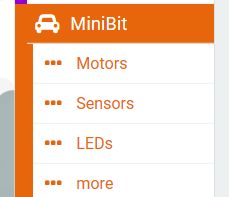
Once loaded, you will have a MiniBit menu item with 4 sub-folders:

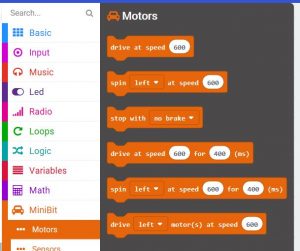
Motor Blocks

The first command “Drive at speed 600” will set both motors to speed 600. If you do nothing more, the MinBit will continue going forward forever.

The speed value can be from -1023 (full speed reverse) to 1023 (full speed forward). Setting the speed to 0 will stop the motors

There is also a block for spinning – left motor and right motor turn at the same speed but in opposite directions.

Both the drive and spin blocks have a paired block that will drive (or spin) for a selected amopunt of time and then stop

There are two ways of stopping. Coasting to a stop or braking. If you set the speed to 0 or use the “stop with no brake” command, then it will stop gently over the coourse of a second or so 9depending on initial speed). If you use the “stop with brake” block (or the drive/spin for a time block) then it will stop almost immediately.

Finally, you can drive each motor individually. For instance if you set the left motor to drive at 600 and the right motor to drive at 1000, then it will perform an arc towards the left

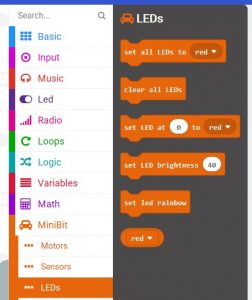
LED Blocks

You can use these blocks to set and clear one or all the LEDs.

Note that the MiniBit defaults to automatically updating the LEDs whenever any change is made see the “more…” section to learn how and why to change this behaviour

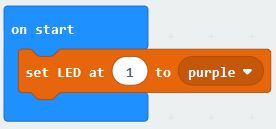
The LEDs on the MiniBit are labelled from 0 to 3. Use these numbers in the Makecode blocks to change the colour. eg setting LED 1 to Purple could be done like this:

The default brightness level is 40. This is plenty bright enough for most uses, saves damaging eyes, and reduces battery consumption. If required you can change the brightness from 0 up to 255

Sensor Blocks

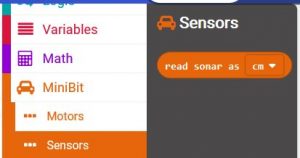
Only one sensor in here; the ultrasonic distance sensor. You can get the values to the nearest object in cm, inches or microseconds

More Blocks

These are the advanced usage blocks. Most students will not need to use them.

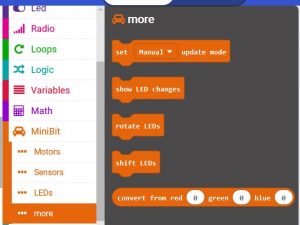
  • Set update mode is used to switch between automatic LED updates or manual LED updates. The default is for automatic updates: every change to the LEDs results in all the LEDs being written to with the updated values. This is easy to understand, but it does mean that when making a lot of changes it can slow things down considerably. If doing that, it is best to use Manual update mode, make all the changes required, then use the show LED changes block to make all the updates in one go.
  • Rotate LEDs block will move the colour in LED 0 to LED 1, LED1 to LED2, LED2 to LED3 and LED3 to LED0. If done repeatedly, with a delay between each one, it will show the lED colours rotating around all the 4 LEDs.
  • Shift LEDs block will move LED0 to LED1, LED1 to LED2 and LED2 to LED3. It will blank LED0. So all the colours will disappear one at a time from 0 to 3
  • You can also create your own colours and replace the fixed list of colours in any command using the convert from red, green, blue block. For example, to set LED0 to a blue-green colour:

Programming in microPython

Driving Motors

The motors use 2 pins each to determine the speed and direction. In microPython we use write_analog ( ) to set the first pin to a value between 0 and 1023 and the second pin to 0 in order to go forward. To reverse, we swap the pins so that the first pin is set to 0 and the second pin is set to the value.

On the MiniBit the left motor uses pins 12 and 8, and the right motor uses pins 16 and 14.

So to move the left motor forwards at speed 600:

pin12.write_analog(600)
pin8.write_digital(0)

And to move the right motor in reverse at speed 450:

pin16.write_digital(0)
pin14.write_analog(450)

To stop with no brake, use write_digital ( ) to set both pins to 0. To stop with brake, set both pins to 1.
eg. stop left motor with coasting and right motor with brake:

pin12.write_digital(0)
pin8.write_digital(0)

pin16.write_digital(1)
pin14.write_digital(1)

So a complete, but fairly useless, program to drive the motors for 2 seconds and then stop quickly, would look like this:

from microbit import *
pin12.write_analog(600)
pin8.write_digital(0)
pin16.write_analog(600)
pin14.write_digital(0)
sleep(2000)
pin12.write_analog(0) # temporary fix for python bug
pin12.write_digital(1)
pin8.write_digital(1)
pin16.write_analog(0) # temporary fix for python bug
pin16.write_digital(1)
pin14.write_digital(1)

Note the 2 lines that write_analog(0) before swapping a pin from analog to digital. These are required until a fix is obtained for the python PWM driver continually updating the pin type to analog

Lighting the LEDs

This uses the standard neopixel code, with the LEDs connected to Pin 13.

At the top of your program add import neopixel then:

leds = neopixel.NeoPixel(13, 4)

leds is then an array of all 4 LEDs. leds[0] refers to the LED 0 and leds[3] refers to LED3. Each element of the array is a set of 3 numbers representing the Red, Green and Blue values (each 0..255) for that LED. So to set LED2 to Blue:

leds[2] = (0, 0, 255)

All this does is update the array. To show the new value of the array, we need to call the show ( ) function as follows:

leds.show ( )

Reading the Ultrasonic Distance Sensor

The ultrasonic sensor breakout is on pin15.

The concept is simple: send an ultrasonic pulse out, then time how long it takes to return. Using the speed of sound and some maths, we can then work out the distance. The following complete program has 2 parts to it: a function sonar ( ) which returns the distance to the object, and the main code in a loop which continually prints the distance. We also need to import the utime library:

from microbit import *
from utime import ticks_us, sleep_us

def sonar():
    pin15.write_digital(1) # Send 10us Ping pulse
    sleep_us(10)
    pin15.write_digital(0)
    pin15.set_pull(pin15, NO_PULL)
while pin15.read_digital() == 0: # ensure Ping pulse has cleared
        pass
    start = ticks_us() # define starting time
    while pin15.read_digital() == 1: # wait for Echo pulse to return
        pass
    end = ticks_us() # define ending time
    echo = end-start
    distance = int(0.01715 * echo) # Calculate cm distance
    return distance

while True:
    display.scroll(sonar())
    sleep(1000)

Apple Watch upptäckte oregelbunden hjärtrytm i stor amerikansk studie

Uppgiftskod: AWUOHISAS-TKSVBISH

Frågeställning: Hur kan bärbar konsumentelektronik och artificiell intelligens användas inom sjukvården för att rädda liv?

Bildresultat för apple watch 3 pulse
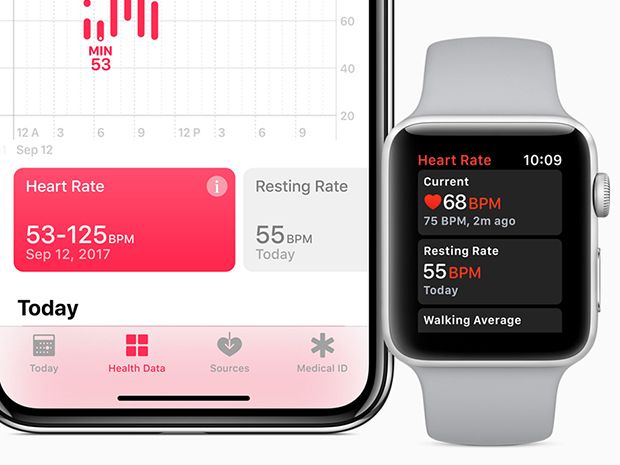
Bild på Apple Watch med tillhörande hälso-app för att mäta hjärtats puls.
Photo: Apple

Översatt artikel från : https://www.reuters.com/article/us-health-heart-apple/apple-watch-detects-irregular-heart-beat-in-large-u-s-study-idUSKCN1QX0EI

3-10 minuters lästid

(Reuters) – Apple Watch kunde upptäcka oregelbundna hjärtpulsfrekvenser som kan signalera behovet av ytterligare övervakning för att upptäcka ett allvarligt hjärtrytmproblem, enligt data från en stor studie finansierad av Apple Inc, som visar en potentiell framtida roll för bärbar konsumentelektronik (s k wearables) inom vården.

Bild på ett pumpande hjärta som visar hjärtats funktion.

Forskare hoppas att tekniken kan hjälpa till vid tidig upptäckt av förmaksflimmer eller hjärtflimmer (eng. Atrial Fibrillation, AF), den vanligaste formen av oregelbundna hjärtslag. Patienter med obehandlad förmaksflimmer har fem gånger större sannolikhet att drabbas av stroke.

Informationsfilm om förmaksflimmer 1:08

Resultat från den största förmaksflimmer-undersöknings- och detekteringstudien med över 400 000 Apple Watch-användare som var inbjudna att delta, presenterades på lördagen den 16 mars 2019 vid American College of Cardiology-mötet i New Orleans.

Av de 400 000 deltagarna fick 0,5 procent, cirka 2000 personer, meddelanden om en oregelbunden puls via appen i deras smarta klockor. Dessa personer fick sedan bära en mobil EKG-apparat (elektrokardiografi) för efterföljande detektion av förmaksflimmerepisoder.

En tredjedel av dem vars klockor upptäckte en oregelbunden puls bekräftades ha förmaksflimmer med hjälp av EKG-tekniken, sa forskarna.

84 procent av de oregelbundna hjärtpulsmeddelandena bekräftades senare ha varit hjärtflimmer-episoder, visade data.

”Läkaren kan använda informationen från studien, kombinera den med sin bedömning … och sedan styra kliniska beslut om vad man ska göra med en varning”, säger Dr. Marco Perez, en av studiens ledande utredare från Stanford School of Medicine.

Studien fann också att 57 procent av deltagarna som fick en alert på sin smarta klocka sökte läkarvård.

För företag som Apple ger den här typen av data en kraft i en ny riktning in i sjukvårdsbranschen. Apples nya smarta klocka, Apple Watch Series 4, som blev tillgänglig först efter studien började, och som alltså inte användes i den här studien, har förmågan att ta ett EKG (elektrokardiogram) för att upptäcka hjärtproblem. Den produkten krävde ett godkännande från US Food and Drug Administration (FDA).

Dr. Deepak Bhatt, en kardiolog (typ av hjärtspecialist) från Brigham and Women’s Hospital i Boston som inte var inblandad i försöken, kallade den en viktig studie, eftersom användningen av denna typ av bärbar teknik bara kommer att bli mer utbredd.
”Studien är ett viktigt första steg för att ta reda på hur kan vi använda dessa teknologier på ett sätt som bygger på bevis,” han sa.

Under de första lite drygt 2 minuterna i denna filmade intervju diskuterar Drs. Deepak Bhatt och Peter Block ”AFib detection using the Apple Watch” och beskriver det som en disruptiv teknologi som kan förändra sjukvården (Apple Heart – 00:30-02:30);

Forskare uppmanar till försiktighet av läkare att använda data från konsumentprodukter vid behandling av patienter. Men de ser också stor framtidspotential för denna typ av teknik.

”Förmaksflimmer är bara början, eftersom denna studie öppnar dörren för att ytterligare undersöka bärbar teknik och hur de kan användas för att förebygga sjukdom innan den slår ut,” säger Lloyd Minor, dekan för Stanford School of Medicine.

Uppgiftskod: AWUOHISAS-TKSVBISH

Diskussionsfrågor:

Syftet med följande diskussionsfrågor är att låta eleverna arbeta språkutvecklande med artikeln där de tränar, utvecklar och visar sina kunskaper och förmågor inom läsförståelse, att ta del av fakta, uttrycka sig i tal och skrift, argumentera, resonera, beskriva, förklara och tolka olika typer av texter. De kan även källkritiskt granska fakta och påståenden, hänvisa till olika källor, reflektera och ta ställning till egna personliga val gällande användningen av tekniska hjälpmedel för att främja vård och hälsa.
Lämpliga arbetsmetoder kan vara t ex EPA (Enskilt – Par – Alla), jobba i basgrupper eller individuellt.

  1. (TkBiSv) Vad handlar artikeln om? Sammanfatta det viktigaste.
  2. (TkBiSv) Vad är nyheten i artikeln?
  3. (TkBiSv) Är det en positiv, negativ eller neutral nyhet? Finns det flera perspektiv?
  4. (TkBiSv) Vem ligger bakom artikeln? Vem har skrivit den, vem är avsändaren, vem står som garant för faktan?
  5. (TkBiSv) Är artikeln trovärdig? Finns det några tveksamheter i artikeln? Motivera ditt svar med sakliga argument.
  6. (Sv) I vilken mån anser du att det är en argumenterande, beskrivande, förklarande, debatterande, påverkande, informerande eller problematiserande artikel?
  7. (TkBiId) Ge exempel på fler liknande produkter som kan användas för att mäta puls och hjärtrytm.
  8. (TkBiIdShSv) Vilka fördelar kan det finnas med att använda den här typen av teknik, som privatkonsument och inom vården?
  9. (TkBiIdShSv) Vilka eventuella nackdelar och risker kan det finnas med att använda den här typen av teknik, som privatkonsument och inom vården?
  10. (Tk) Har du själv, eller någon du känner, erfarenhet från att använda den här typen av teknologi?
  11. (Tk) Känner du någon person som skulle ha behov av att använda den här typen av teknologi?
  12. (TkBi) Skulle du själv kunna tänka dig att använda den här typen av teknologi för att få reda på om du har eller är på väg att få hjärtproblem?
  13. (TkBiShSyv) Vad behöver man kunna för att utveckla en sådan här produkt?
  14. (TkBiId) Vad behöver man kunna som konsument för att ha användning och nytta av en sådan här produkt?
  15. (TkBiSyv) Vad behöver vårdpersonalen kunna för att ha användning för en sådan här produkt inom sjukvården?
  16. (TkBiIdShSyv) Hur tror du att den här typen av produkter och teknologier kommer förändra vår hälsa, våra beteenden och framtidens sjukvård?
  17. (EnTkBi) Läs ursprungsartikeln på engelska och se filmklippet med intervjun 00:00-02.30. Gör en sammanfattning av vad det handlar om och översätt texten till svenska.
  18. (BiSvIdTk) Vad är puls? Var på kroppen kan man mäta puls och hur? Vad är hjärtrytm och vad innebär förmaksflimmer? Vad är stroke?
  19. (Ma) Hur många procents större risk har personer med obehandlad förmaksflimmer att drabbas av stroke?
  20. (MaSv) Hur många personer i undersökningen bekräftades ha förmaksflimmer med hjälp av EKG-tekniken?
  21. (Ma) Skapa visuella illustrationer till statistiken som presenteras i texten. T ex cirkeldiagram eller stapeldiagram.
  22. (BlTk) Skapa en annons eller ett reklamblad för en helt ny, tidigare okänd produkt, med den här teknologin och funktionen.
  23. (SvBiTk) Skriv en kritiskt argumenterande text som tar avstånd från att använda Apple Watch specifikt, eller den här typen av produkter och teknologier generellt för att detektera och förutspå sjukdomar och kartlägga vår hälsa.
  24. (TkBi) Utveckla en egen teknisk produkt, en uppfinning i form av wearable technology (bärbar teknik, kroppsnära teknik), som kan mäta din puls och hjärtrytm. (Använd gärna skolprogrammet ”Uppfinnarresan” från Finn upp)
  25. (BiSyv) Om du är intresserad av att veta mer om vad EKG är och hur man tolkar EKG kan du t ex läsa första kapitlet i kursen ”Introduktion till hjärtfysiologi och elektrokardiologi”. Webbsidan ekg.nu är en komplett e-bok och webbutbildning i klinisk EKG-diagnostik som vänder sig till läkare, sjuksköterskor, ambulanspersonal, studenter och forskare som vill lära sig EKG-tolkning. Sidan används på samtliga medicinska universitet och universitetssjukhus, så funderar du på att studera till ett vårdyrke så kan du få en inblick i vad du kommer att få lära dig.

Kopplingar till LGR 11:
Årskurs: 7-9
Ämne: Tk teknik, Sv svenska, Sh samhällskunskap, Bi biologi, En Engelska, Ma matematik, Id Idrott och Hälsa, Bl Bild, Syv Studie och Yrkes-vägledning.
Syftestext:
Centralt Innehåll:
Kunskapskrav:

Sidan uppdaterad 2019-03-18